Saturday, May 26, 2018

How do I highlight code in the blog

May be you are a developer who has plenty of ideas to share, and you want to start your own blog? In this case you need a code highlighting first!

How do I highlight code here? Well, first of all I import Google code-prettify script, basically every post in this blog starts with the line: <script src="https://cdn.rawgit.com/google/code-prettify/master/loader/run_prettify.js"></script>
To add some Swift code, like this: let reality = true, I use the code tag: <code class="prettyprint lang-swift">let reality = true</code> Here prettyprint feeds our code block to the prettifier and lang-swift is a language hint. In this Stackoverflow answer you can find a list of possible hints.

I apply custom CSS to the code block. In Blogger you can do it following the next path: Theme > Customize > Advanced > Add CSS. code { white-space: pre-wrap; // Required to keep formatting, still can wrap long lines font-size: 15px; line-height: 100%; background-color: #f8f7f1; padding: 4px 2px 4px 1px; } Additionally, to create nice code blocks like above, I use the block class: code.block { display: block; padding: 0.4em 0.15em 0.4em 0.15em; margin: 0.4em 0 0.4em 0; }

Tuesday, May 22, 2018

Swift guidelines to follow

I started using Swift in my projects in 2015 and, as any Swift newbie, I was surprised by the lack of code style guidelines. Here I will share my experience of 3 years and point guidelines that worth following in different aspects of development.

Apple Swift API Design Guidelines provide great rules for naming. I also recommend to use Objective-C style prefixes for public extensions to avoid possible conflicts: /// MARK: Module XXX extension UIImageView { func xxx_loadImageFromURL(_ url: URL) { // ... } } // ... customImageView.xxx_loadImageFromURL(url)
Built-in Xcode formatter (^I) closes most questions with indentation. Just accept, that sometimes it can produce strange results, like this:
URLSession.shared.dataTask(with: apiURL) { (data, _, err) in }.resume() instead of this:
URLSession.shared.dataTask(with: apiURL) { (data, _, err) in }.resume()
Considering newlines, I recommend to follow good old Google Objective-C Style Guide, which is stating: "Use vertical whitespace sparingly."

All the rest is covered by The Official raywenderlich.com Guide. This guide is consistent and detailed, yet simple. It's widely adopted in different projects and tutorials, so it's well tested and recognizable. Note, that the guide is optimized for tutorials and sample code, which is good, because it's easy to read. But you can ignore some rules, like Minimal Imports or Use Type Inferred Context, because they don't improve reading but can slow down the writer.

While writing this post I found another style guide from LinkedIn. I don't recommend to follow it. Some rules listed there are obvious, some duplicate Xcode warnings, and some rules are disputable. The guide is way too strict, too large to remember, and thus it will be hard to adopt in your team.

Tuesday, February 20, 2018

Power of Extensions

Article is valid for Swift 4.0.

In this article I want to share my practical and emotional experience of using Swift extensions. I’m really impressed how powerful they become in comparison with old Objective-C categories.

To create a category in Objective-C you must create 2 files (.h and .m) and support both private and public interfaces. Categories are unsafe: compiler allows you to redefine any method in a class/subclass/superclass and according to Docs (Avoid Category Method Name Clashes paragraph) the behavior is undefined. Actually, it depends on the order of files in Compile Sources list. Also, the one moment is not so obvious, but very important: each Objective-C category should have a name. Why that's an issue? – you may ask. – Because the name usually corresponds to the category features so for each new feature you need a new category, that means 2 files. Such operations eat time, thats why.

Now compare it to Swift. Compiled extensions in swift are much safer and predictable. Try to redefine a method or variable – you will get an `Invalid redeclaration` compiler error. Swift extension doesn't need a name and to create it you usually don't need a separate file. Thanks to this I'm shooting extensions like from a machine gun.

Interesting, that Objective-C also has its own extensions which are just categories without a name. But such anonymous categories can be defined only in the .m file and therefore are limited.

Here I put some common extension applications:
  1. Code grouping. Implementing protocols in the separate blocks: // MARK: UITableViewDataSource extension ScheduleViewController: UITableViewDataSource { // ... } (Though protocol methods implemented in extensions couldn’t be overridden yet.)

    Thematic or logical scopes:
    // MARK: - PRIVATE private extension AppDelegate { func makeRootViewController() -> UIViewController { // ... } }
  2. New way to define constants:
    extension Int { static let maxLocalNotificationsCount = 64 } extension TimeInterval { static let secondsInMinute: TimeInterval = 60 static let secondsInHour: TimeInterval = 60 * .secondsInMinute }
    Usage: request.timeoutInterval = 2 * .secondsInMinute

  3. Default implementation. A powerful feature since Swift 3. protocol OffsetListParserProtocol: class { // ... func loadNext(completion: LoadHandler?) } extension OffsetListParserProtocol { func loadNext(completion: LoadHandler?) { guard !isFinished && !isLoading else { completion?(nil, nil) return } // Start loading... } }
    BTW, it's the only way to create a common implementation for struct's because they cannot inherit.

  4. And of course extending the abilities of existing system, third party or your own types: public extension UIViewController { func firstAncestorOfType(_ type: T.Type) -> T? where T: UIViewController { guard let someParent = parent else { return nil } if let requiredParent = someParent as? T { return requiredParent } else { return someParent.firstAncestorOfType(type) } } }

Handy extensions that we create from time to time can be aggregated in git submodules or Swift frameworks, allowing to share improvements among a whole bunch of projects, greatly rising the speed of development. Instead of copypasting the code snippets you just create extensions (less often types or global functions). Like this:
// Example from my SwiftEssentials framework public extension UIColor { var hexString: String { var r: CGFloat = 0 var g: CGFloat = 0 var b: CGFloat = 0 getRed(&r, green: &g, blue: &b, alpha: nil) let intR = Int(round(r * 255)) let intG = Int(round(g * 255)) let intB = Int(round(b * 255)) return String(format: "#%02lX%02lX%02lX", intR, intG, intB) } convenience init(Hº: CGFloat, S%: CGFloat, B%: CGFloat, A: CGFloat) { self.init(hue: Hº / 360, saturation: S% / 100, brightness: B% / 100, alpha: A) } convenience init(hex: UInt32, alpha: CGFloat) { self.init( red: CGFloat((hex & 0xFF0000) >> 16) / 255, green: CGFloat((hex & 0x00FF00) >> 8) / 255, blue: CGFloat(hex & 0x0000FF) / 255, alpha: alpha ) } }
I’m very excited about new possibilities that Swift provides. I have learned Swift since the origin, see how it grows and I don't stop to notice how fast, convenient and productive this language is. Due to extension's I don’t bother if I see any imperfections in the system libraries anymore. I just fix them and forget :)
public extension UIView { func removeSubviews() { for subview in subviews { subview.removeFromSuperview() } } }

Saturday, February 3, 2018

Changing view's type on the Storyboard


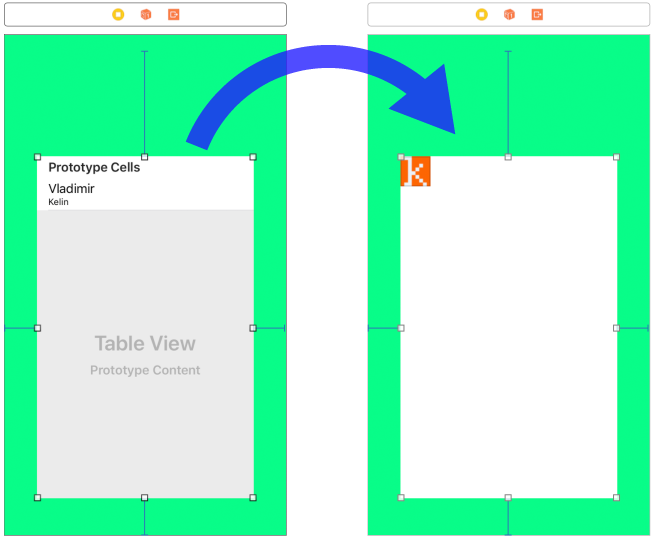
Suppose the design of your app changed, and now you need to replace the Table View with a Collection View keeping all the constraints along with views hierarchy.
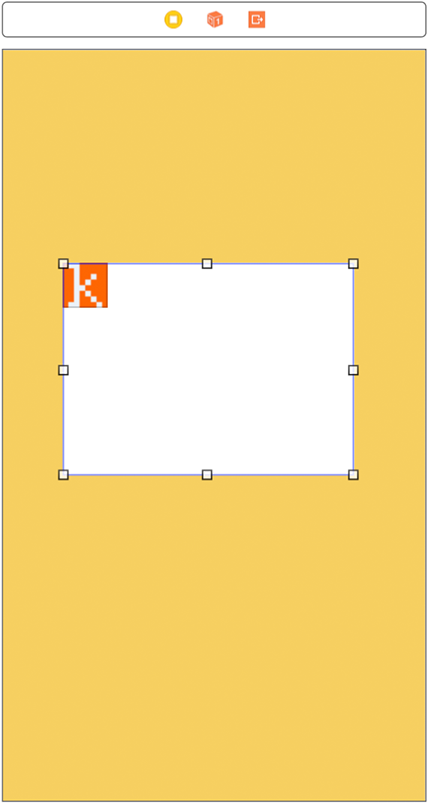
Drop a new View Controller on the storyboard and put a Collection View inside. Rename it in the left panel (called Document Outline). Name it "The Replacement" so you will be able recognize it later. Now switch to the Source Code through the Open As.
Now the storyboard looks like XML markup. Find the Table View you need to replace, it will be scoped within the tableView tag.


Copy its id (example: id="8Oa-xL-ums"). It points to the view in constraints and outlets. Now find the new Collection View under the collectionView tag.


Copy everything including the enclosing tags: <collectionView ...</collectionView> and paste it instead of the tableView. Replace Collection View's id with the value you copied from the Table View. Before switching back to Interface Builder you need to clean up the storyboard. Remove the scene of the temporary View Controller that you created at the beginning of the tutorial. Delete everything between tags and the preceding comment: <!--View Controller><scene ...</scene>. If you don't do this you will have an error because of duplicated id.


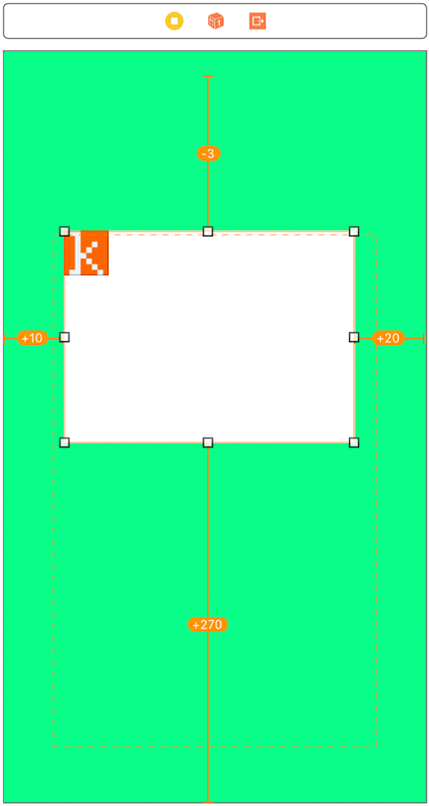
Now you will have the new Collection View constrained like the Table View but misplaced, because it's was copied with the rect.
Click Update Frames and enjoy the result!

Here is the list of storyboard tags for different UI classes. Who knows, may be it will be useful.

arscnView ARSCNView
arskView ARSKView
glkView GLKView
mapView MKMapView
mtkView MTKView
sceneKitView SCNView
skView SKView
activityIndicatorView UIActivityIndicatorView
button UIButton
collectionView UICollectionView
datePicker UIDatePicker
imageView UIImageView
label UILabel
navigationBar UINavigationBar
pageControl UIPageControl
pickerView UIPickerView
progressView UIProgressView
scrollView UIScrollView
searchBar UISearchBar
segmentedControl UISegmentedControl
slider UISlider
stackView UIStackView
stepper UIStepper
switch UISwitch
tabBar UITabBar
tableView UITableView
textField UITextField
textView UITextView
toolbar UIToolbar
view UIView
containerView UIView (with embedded View Controller)
visualEffectView UIVisualEffectView
webView UIWebView
wkWebView WKWebView

Saturday, January 27, 2018

Catching nil as Error

Github gist.

I've posted this as an answer on stackoverflow before, and the information was highly appreciated by some people. The question was like: “How to catch any error, specially unexpectedly found nil in Swift?" Though the author was asking about catching system errors, I decided to post my super-handy Unwrap Snippet there.
struct UnwrapError: Error, CustomStringConvertible { let optional: T? public var description: String { return "Found nil while unwrapping \(String(describing: optional))!" } } public func unwrap(_ optional: T?) throws -> T { if let real = optional { return real } else { throw UnwrapError(optional: optional) } }
The idea of this approach is to replace multiple if let and guard let statements with a single do-try-catch block. You can:
do { // Parse JSON and assign variables which were defined somewhere above let dictionary = try unwrap(JSONSerialization.jsonObject( with: data, options: .allowFragments) as? [String: Any]) isAdsEnabled = try unwrap(dictionary["isAdsEnabled"] as? Bool) // While calling function which require a non-optional parameter in one line of code imageView.image = try UIImage(data: unwrap(receivedData)) // And also you can simplify the building of multipart data var data = Data() data += try unwrap(dispositionString.data(using: .utf8)) data += someContent data += try unwrap("\r\n".data(using: .utf8)) } catch error { // Handle error // ... // and exit return nil }
Those who make apps with web backend will definitely like.

Friday, January 19, 2018

Safer parsing with JSONSerialization in Swift

Github gist.

Most people use the following snippet to get a value from an object provided by the JSONSerialization:
guard let name = jsonDictionary["name"] as? String else { return } ...
It's not obvious, but this code is unsafe. It can easily fail if the "name" value will be "111". In this case it may be decoded as NSNumber and casting to String will always fail. The same thing with numbers:
guard let id = jsonDictionary["id"] as? Int else { return } // id can be a "3" String! ... A value like "3" can be decoded both as NSString and NSNumber (more often).

I didn't find any tutorial that would take this issue into account. All of them recommend to use as? to unknown JSON object to basic type. So I post here the correct snippets that will provide stable and predictable results in all possible cases.

JSON helpers

extension String { init?(jsonObject: Any?) { guard jsonObject is NSNull == false else { return nil } let aNSObject = jsonObject as? NSObject if let description = aNSObject?.description { self = description } else { return nil } } } extension Int { var boolValue: Bool { return self != 0 } init?(jsonObject: Any?) { if let number = jsonObject as? NSNumber { self = number.intValue } else if let string = jsonObject as? NSString { self = string.integerValue } else { return nil } } } extension Bool { init?(jsonObject: Any?) { if let integer = Int(jsonObject: jsonObject) { self = integer.boolValue } else { return nil } } } extension Double { init?(jsonObject: Any?) { if let number = jsonObject as? NSNumber { self = number.doubleValue } else if let string = jsonObject as? NSString { self = string.doubleValue } else { return nil } } }
All objects produced by JSONSerialization are instances of NSString, NSNumber, NSArray, NSDictionary, or NSNull.

Tuesday, March 28, 2017

How to Install Ringtone on iOS

This detailed guide is intended to cover the whole process of ringtone installation on any iOS device, including iPhone, iPad and iPod. It's constantly updated to correspond to the latest versions of iOS, macOS and other related software, such as iTunes.

Navigation:

Step 1. Prerequisites
Step 2. Connection
Step 3. Import ringtones to iTunes
Step 4. Open Tones synchronization
Step 5. Sync
Step 6. Sound Settings
Step 7. Set the ringtone
Apps by me

Step 1. Prerequisites

To install a ringtone you will need:
  • iTunes — a computer with iTunes on it.
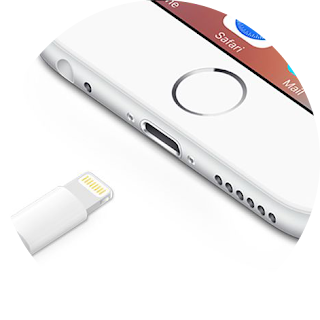
  • Lightning - USB — to connect the device to a USB port of the computer.
  • .m4r — a ringtone file on your computer with .m4r extension.
Ringtones can't be longer than 40 seconds! Other tones (Text Tone, Reminder Alert) are limited to 30 seconds.
.m4r is an extension of MPEG-4 audio just like .m4a, but treated by iTunes as a ringtone. You can create .m4r simply by renaming an .m4a file. When you haven't .m4a file, you can convert it from any other audio format or download a new ringtone with the appropriate extension.
Older devices require Apple 30-pin to USB Cable instead of Lightning.

Step 2. Connection

Connect your device to your computer using the USB cable.
You can sync the device with iTunes using Wi-Fi. In this case you will need the USB cable only once: to activate wireless syncing. Read more.

Step 3. Import ringtones to iTunes

  1. Open iTunes. Make sure that you have the latest version.
  2. Open your ringtones in the Finder.
  3. Drag and drop them to iTunes.
If you can't drop an .m4r file to iTunes, then try to select a different category in the top panel, for example Tones. In Tones category you can check ringtones duration or edit the name and other metadata.
Another way to import ringtones is to double-click them.

Step 4. Open Tones synchronization

  1. Click the device icon.
  2. Click Tones in left panel.

Step 5. Sync

  1. In the Tones section, check Sync Tones > Selected tones.
  2. In the appearing Tones list, select the tones you want to install to your device.
  3. Click Apply.
After syncing will occur, the tones will be copied to the device.
Custom tones which aren't included in the list will be removed from the device!
You also can select to sync All tones for simplicity.

Step 6. Sound Settings

  1. Open Settings > Sounds.
  2. Scroll to SOUNDS AND VIBRATION PATTERNS.
You also can set your tone to the alarm clock. Open the Clock app, go to Alarm > Edit. Select the alarm, touch Sound and select the imported ringtone from the list.
To setup sound for the specific contact open Contacts, and select the contact. Then touch Edit > Ringtone.

Step 7. Set the ringtone

  1. Go to Ringtone.
  2. Select your tone in the RINGTONES list.
You're done! You also can set other sounds (for example Text Tone) in this way.
To stop playing the selected sound, touch it again.
Music created with Garageband can be exported as a ringtone right on the device, bypassing iTunes.
*
If you have questions or suggestions, write a comment. If you found this guide useful, please share it with a friend!

You also may may have a look at the apps created by me: back to top

How to Record Calls on iPhone